By: Kevin DeVuono
Question: What is the recommended way to manually edit nets using WipFrag?
Answer: We recommend that you first find a suitable starting EDP that will delineate the majority of the small-to medium-sized particles. The larger particles will be much easier to manually edit than smaller particles.
To find a suitable starting EDP:
1. With an image open, go to the Options dialog box by clicking on the gears icon in the Toolbar, or by selecting the Fragmentation – Options menu item.
2. It is recommended that you uncheck Show Advanced Controls in order to show the sliders.
3. Begin moving the sliders to create more or less net until the small/medium particles are delineated as best as possible.
Moving any of the sliders to the right will create more net/particles. Do this when the small/medium particles are being fused together into one larger particle.
Moving any of the sliders to the left will create less net/particles. Do this when the medium/large particle are being broken into many smaller particles.
In most cases:
Threshold is typically one of the 3 right-most positions.
Valley Threshold is typically the middle or far right position.
Blur is typically in the middle position; sometimes to the right if the particles are very small.
4. Occasionally you many need hit OK to close the options menu and test the net by right-clicking on potentially problematic areas.
By default, right-clicking will fill the area under the mouse cursor and give you an idea if any particle is being fused or disintegrated.
This can be changed in the Options – Preferences dialog.
5. Repeat steps 1-4 until satisfied with the net.
Now that the small to medium sized particles are being automatically delineated as best as possible, it is time to edit the large net errors. These will typically be large particles that are disintegrated into much smaller particles (due to texture), or smaller particles being fused into a single larger particle.
To edit the errors, simply pick a starting position and move through the image using the ‘Block Leak Test’ tool (default is mouse right-click) to test for major errors:
1. When you find disintegration errors, you have two options:
a. Use the ‘Lasso Delete & Outline’ tool to trace around the entire particle. This tool will delete any net within the shape you drew and will draw net along the line you traced.
b. Use the ‘Block Delete’ tool to quickly delete unnecessary net without deleting the net that is correctly surrounding the particle. This can usually be faster than tracing the entire particle using ‘Lasso Delete & Outline’. 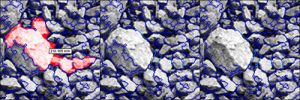
c. When you find a fusion error, use the ‘Free Draw’ tool to draw a line along missing edges.
Simply repeat the above until satisfied. Do not worry about making the net perfectly clean and try to only fix the large errors. The minor errors will become statistically irrelevant as you merge multiple results together. Your results will become more accurate if you take more images and do quick editing than if you were to spend a long time extensively editing just a few images.
Typically, you should not need to spend more than 10-15 minutes, on average, editing each image. The better the lighting, the less editing will need to be done (less than 5 minutes). Very bad lighting can require upwards of 30 minutes of editing.c