

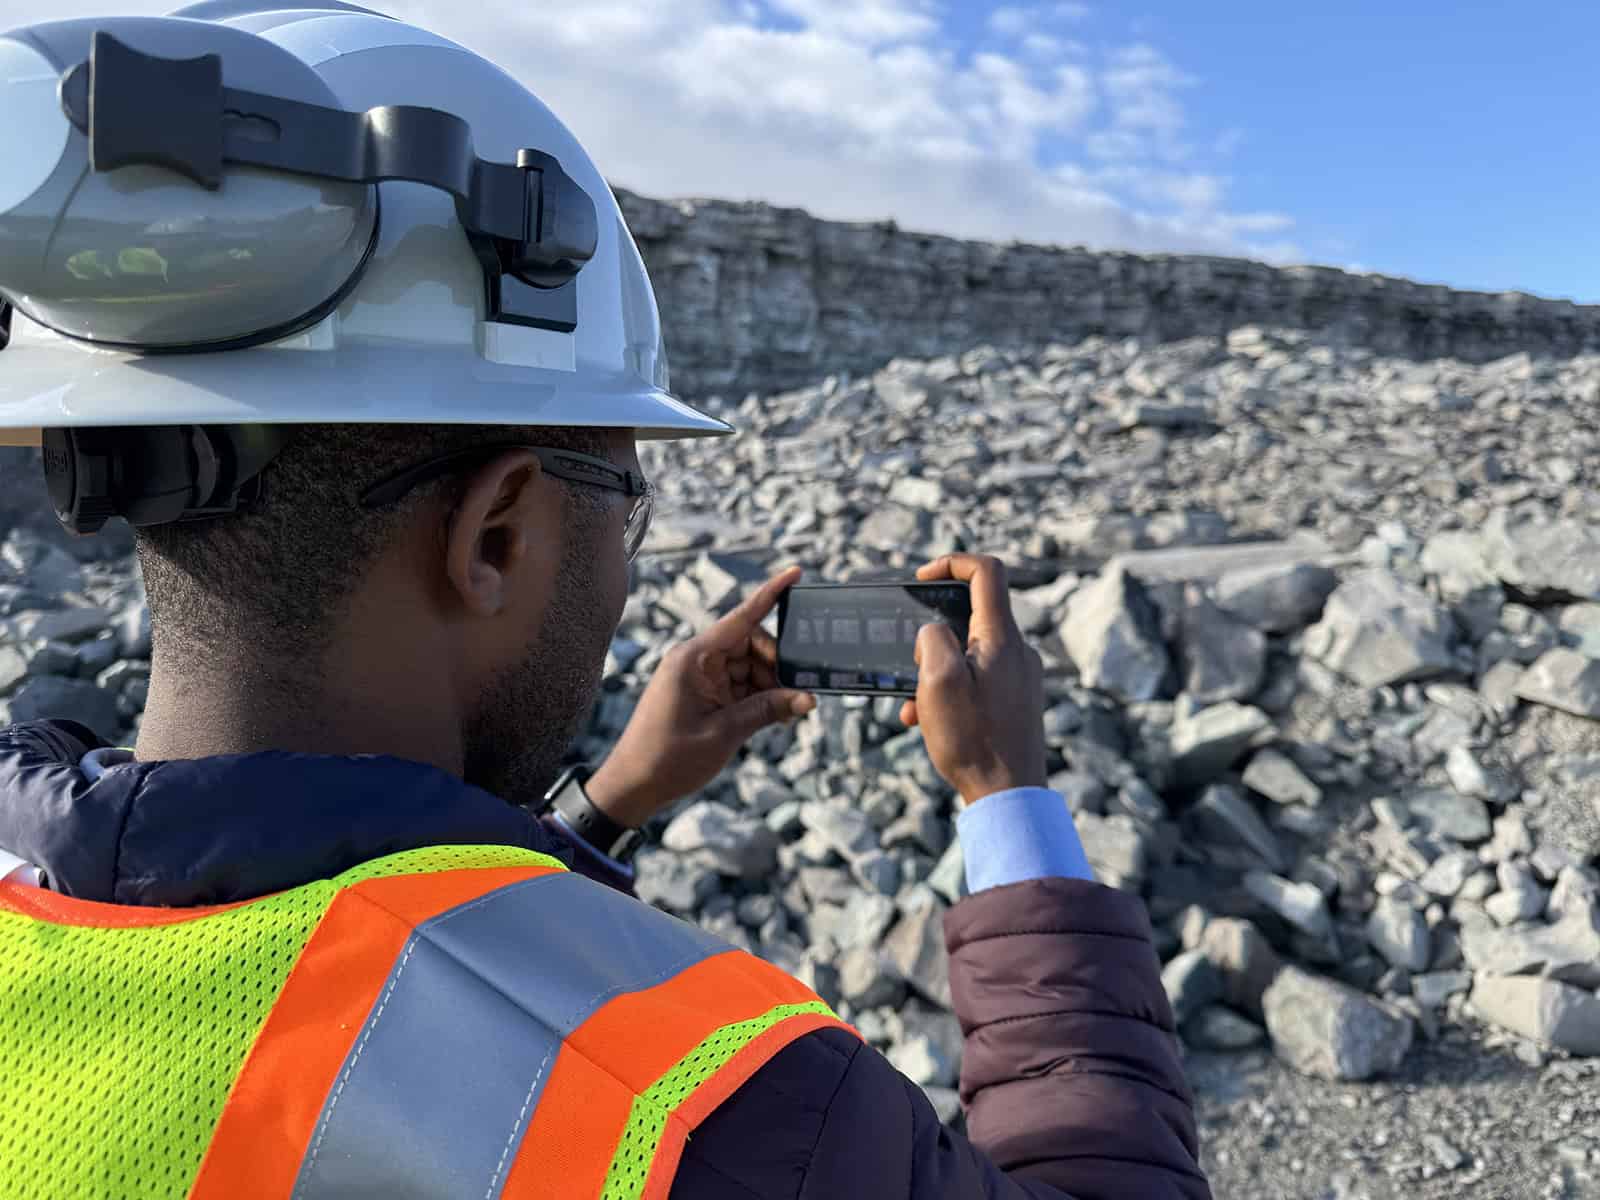
Практическое руководство по сбору репрезентативных изображений для анализа WipFrag.
Содержание
- Как получить качественные результаты WipFrag
- 1. Наземные изображения – кучи, склады и сыпучие материалы.
- 2. Изображения, полученные с помощью БПЛА/дронов – съемка больших площадей.
- 3. Подземная фотосъемка
- 4. Лабораторные образцы, лотки и микроскопия
- 5. Перед тем, как покинуть образец
- Дополнительная информация
Как получить качественные результаты WipFrag
Хороший WipFrag Результаты начинаются с изображений, которые Чёткое, правильно масштабированное и репрезентативное изображение измеряемого материала.
Прежде чем сделать снимок, спросите себя:
- Я могу четко видеть частицы, которые мне нужно измерить?
- Соответствует ли это изображение материалу, который я измеряю?
- Правильно ли я использую метод масштабирования?
Для больших или изменчивых выборок следует делать несколько репрезентативных снимков, а не полагаться на одну фотографию.
Общие правила захвата
| ДЕЛАТЬ | ИЗБЕГАТЬ |
|---|---|
|
✓
Заполните изображение анализируемым материалом.
|
✕
Большие участки неба, пола, стен, оборудования или фона.
|
|
✓
Получайте четкие, хорошо сфокусированные изображения.
|
✕
Частицы, размытые в движении или вышедшие из фокуса.
|
|
✓
Используйте равномерное освещение, обеспечивающее видимость границ частиц.
|
✕
Глубокие тени, блики или переэкспозиция.
|
|
✓
Необходимо собрать достаточное количество частиц, чтобы представить материал.
|
✕
Крупные планы, содержащие лишь несколько частиц.
|
|
✓
Укажите соответствующий диапазон размеров частиц.
|
✕
Выделение только очевидных участков с крупной или мелкой зернистостью.
|
|
✓
При сравнении образцов необходимо придерживаться единого метода захвата.
|
✕
Изменение метода между сопоставимыми образцами.
|
|
✓
При необходимости используйте оптический зум или изменяйте рабочее расстояние.
|
✕
Цифровой зум.
|
|
✓
Для больших или изменчивых выборок используйте несколько изображений.
|
✕
Предположим, что одна удобная фотография представляет всю выборку.
|
| ПОМНИТЬ |
| WipFrag может измерять только то, что видит камера. Если частицу невозможно четко различить на исходном изображении, то ее нельзя достоверно измерить по этому изображению. |
Перейти к:
1. Наземные изображения – кучи, склады и сыпучие материалы.
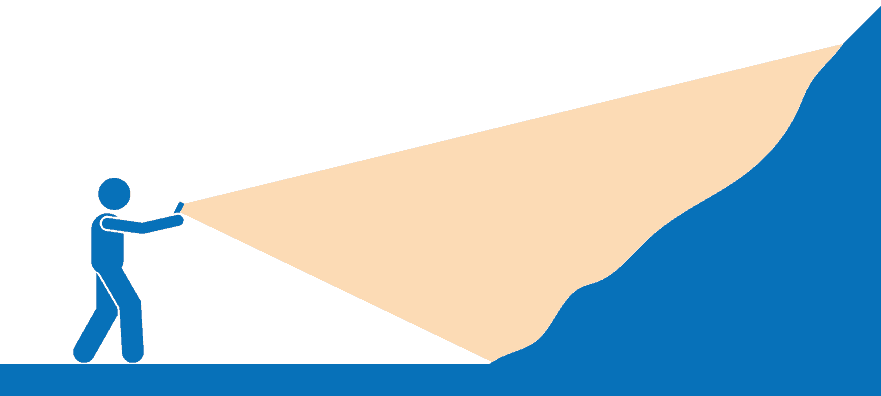
Оцените содержимое кучи – не просто сфотографируйте её.
Насыпи и отвалы редко бывают однородными. Крупный материал может скапливаться у основания или по краям насыпи, в то время как более мелкий материал может скапливаться в других местах или скрываться под поверхностью. Те же принципы применимы и в других случаях. анализ плоскостей суставов с WipJoint.
Фотографируйте несколько репрезентативных мест, а не только самое простое или очевидное.
Для большой кучи:
- Захватывать несколько областей Не делайте несколько снимков одного и того же участка, расположенного поперёк кучи.
- По возможности, включите как центральные, так и периферийные районы.
- Если ведутся земляные работы, по возможности собирайте вновь обнажившийся материал по мере его появления.
- Для анализа следует группировать изображения из одной и той же кучи, взрыва или образца.
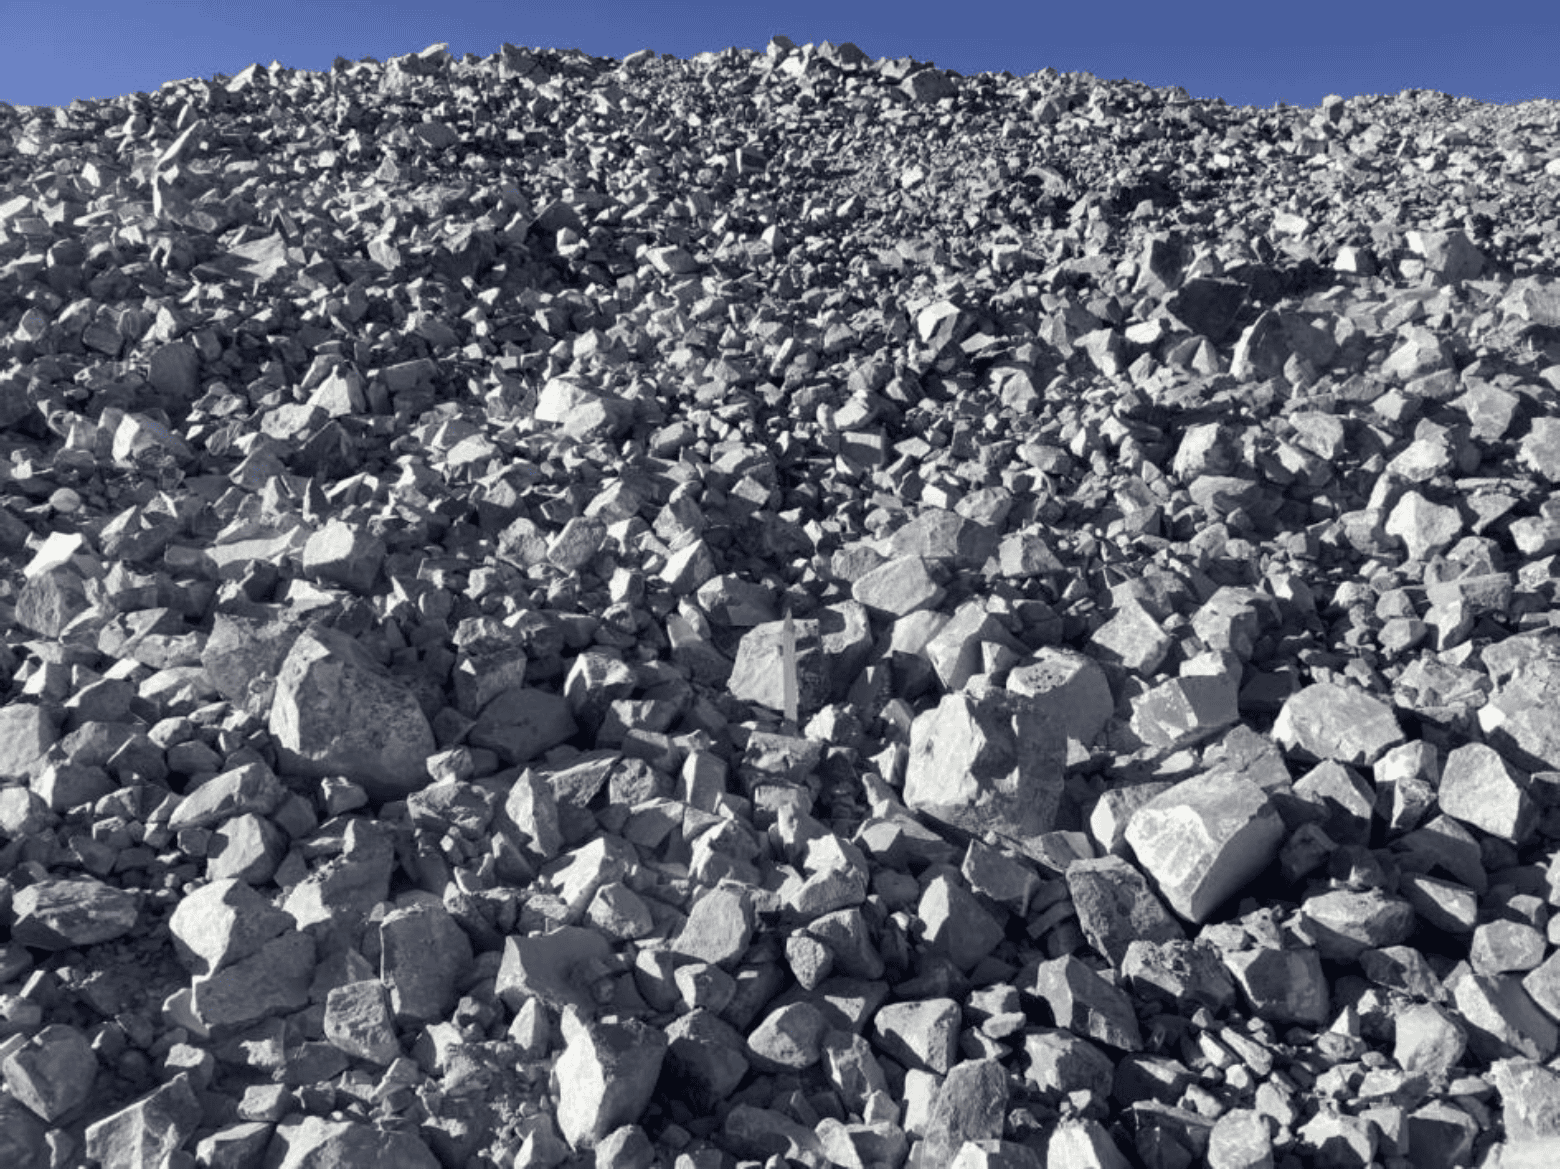
Для выполнения общих работ по устройству каменных насыпей, пять или более репрезентативных изображений Это полезная отправная точка. Используйте больше, когда куча сильно различается по размерам или когда особенно важны крупные частицы.
По возможности, получайте сотни видимых частиц на каждом изображении. Избегайте слишком плотного кадрирования, чтобы одна крупная частица доминировала в поле зрения.
Расположите камеру
Расположите материал максимально прямо и заполните раму битым материалом.
Расположите камеру достаточно перпендикулярно поверхности материала. Отойдите достаточно далеко, чтобы уменьшить перспективные искажения, и используйте оптический зум при необходимости, чтобы заполнить кадр из более удобного или безопасного рабочего положения.
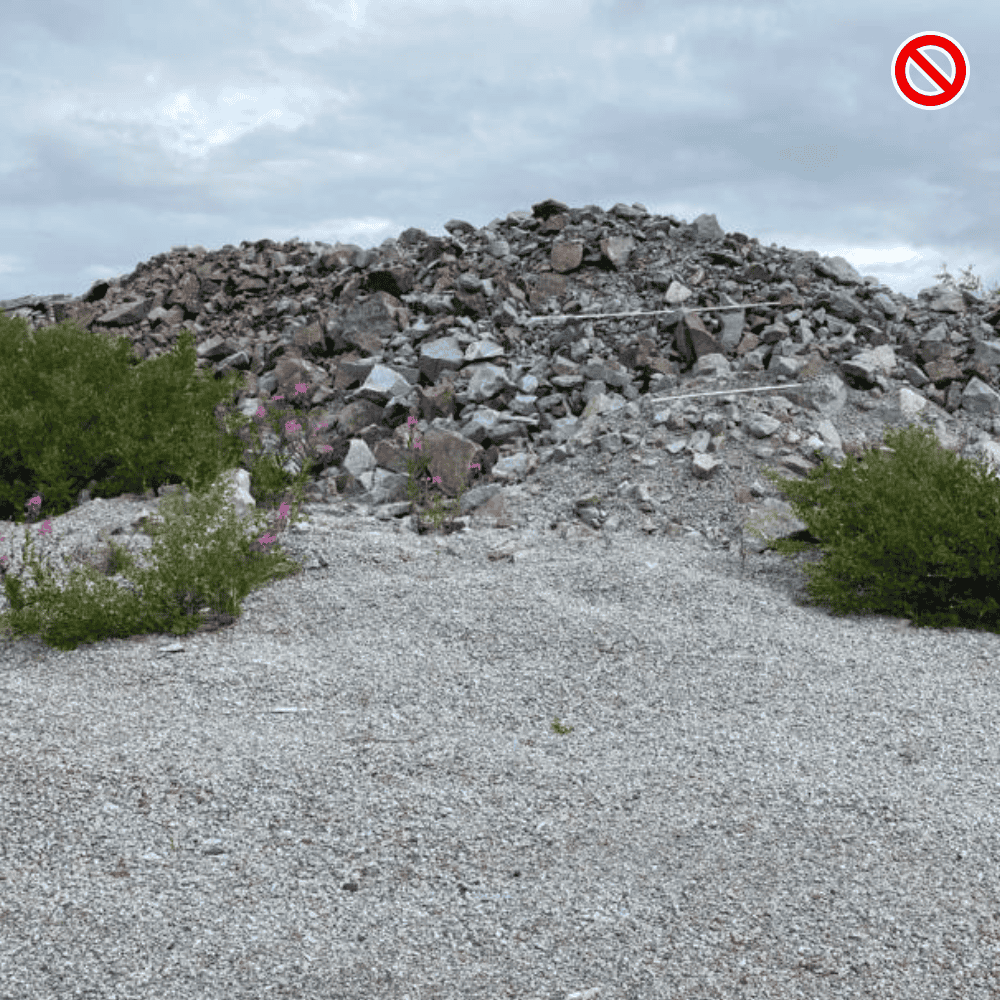
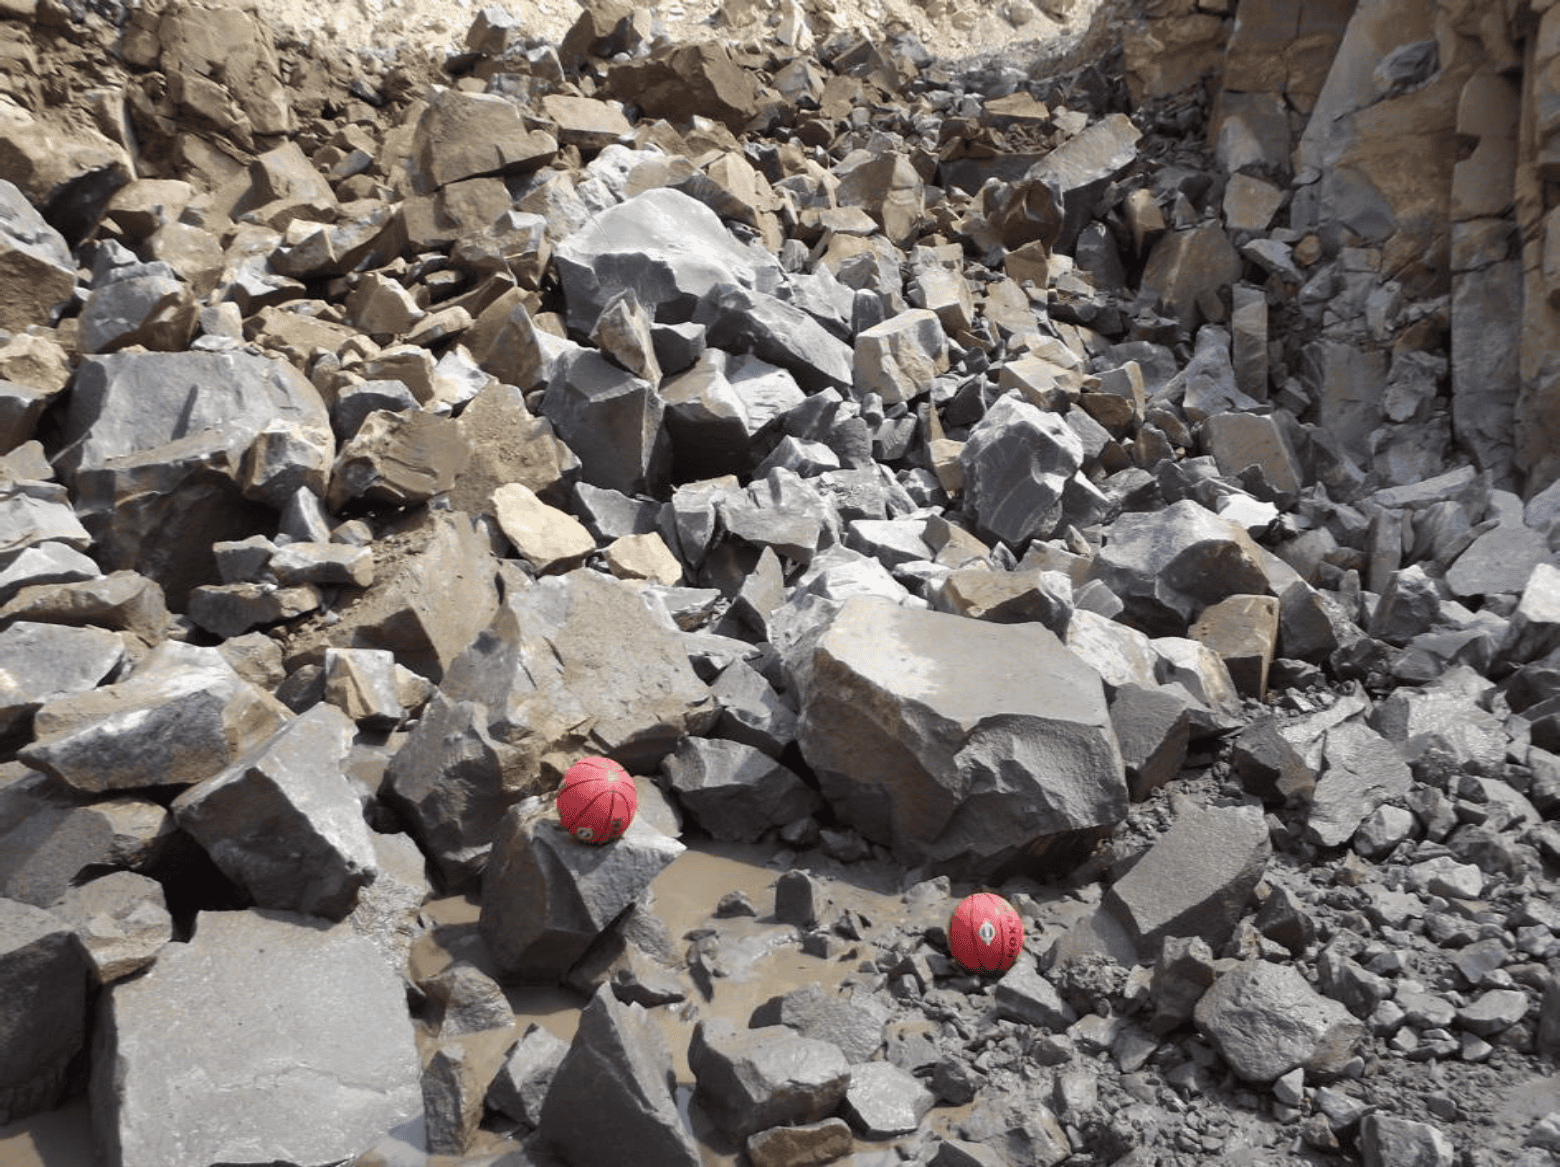
Избегайте крупных планов и широкоугольных фотографий наклонных насыпей. Они преувеличивают размеры частиц, находящихся ближе к камере, и создают впечатление, что более удаленные частицы выглядят меньше.
Выберите правильное расстояние для просмотра
Работайте достаточно близко, чтобы четко видеть важные частицы, но достаточно далеко, чтобы охватить репрезентативную область.
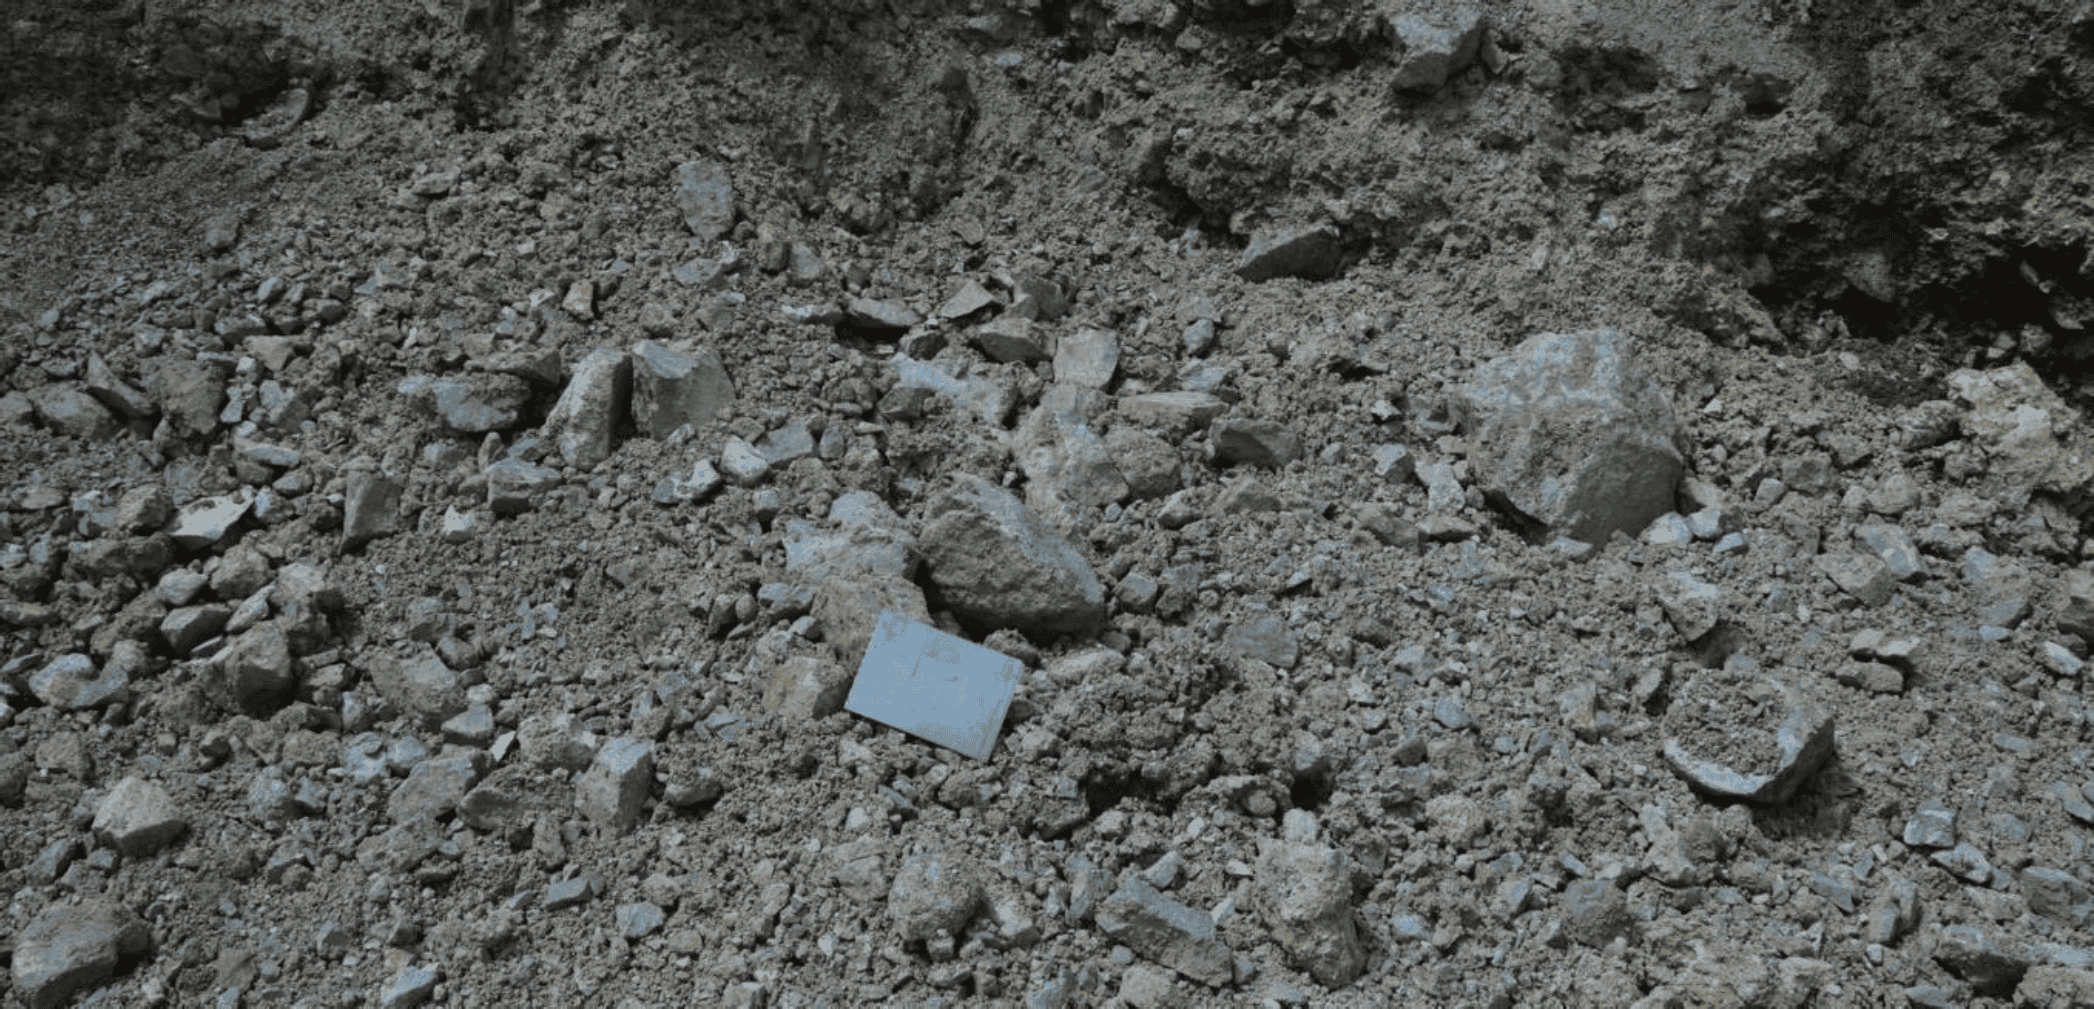
Если вы находитесь слишком далеко, мелкие частицы могут исчезнуть на изображении. Если вы находитесь слишком близко, изображение может не содержать более крупных частиц или слишком большой части кучи.
Для получения изображений с широким распределением частиц по размерам, следует делать дополнительные снимки крупным планом или с более широкого ракурса, а не ожидать, что одно изображение одинаково хорошо представит все размеры частиц.
Масштабирование наземных изображений
Используйте метод масштабирования, соответствующий способу получения изображения.
Автоматическое масштабирование
При захвате изображения непосредственно через WipFrag на поддерживаемом мобильном устройстве функция автоматического масштабирования позволяет обойтись без физической линейки. Для автоматического масштабирования расположитесь примерно на том же уровне, что и снимаемый материал.
Подробнее об Auto Scale читайте в Руководство пользователя WipFrag или посмотреть Видеоурок по автоматическому масштабированию на YouTube.
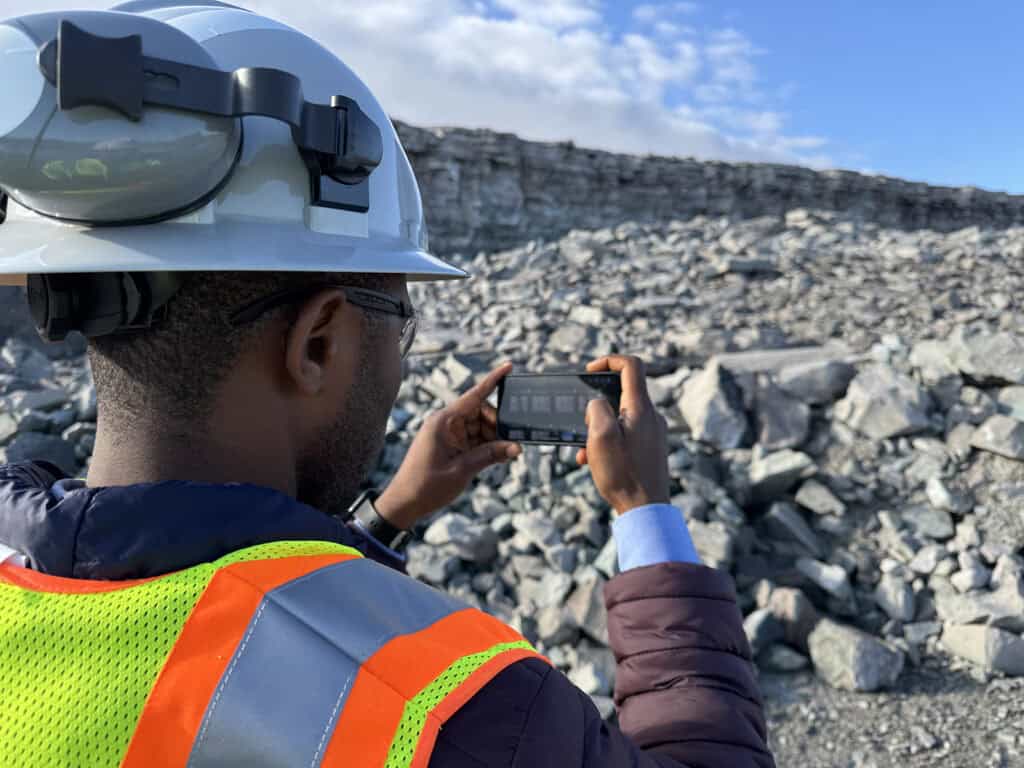
Шкала расстояний (EDM)
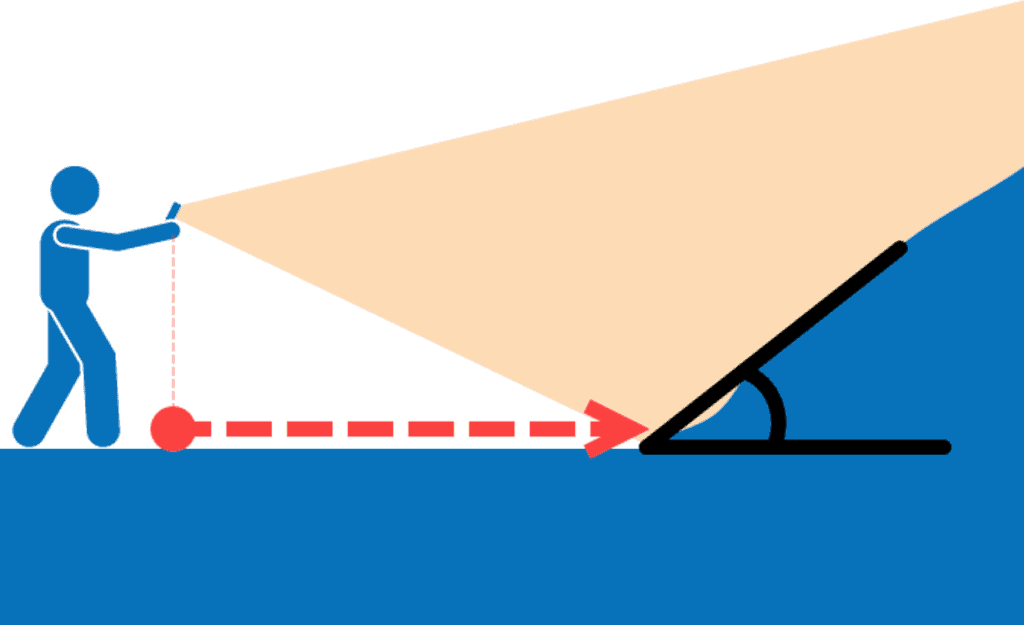
Для измерения расстояния между камерой и материалом можно использовать электронное устройство измерения расстояния (ЭДМ). Также необходимо знать угол естественного откоса материала относительно оси обзора камеры. Эти значения затем будут использованы программой WipFrag для расчета масштаба материала. Этот метод позволяет использовать оптические зум-объективы. Этот метод также можно использовать с дронами для получения масштабированных отдельных изображений насыпей материала и/или откосов, при условии, что дрон может указать расстояние до материала.
Подробнее о шкале расстояний можно прочитать в Руководство пользователя WipFrag.
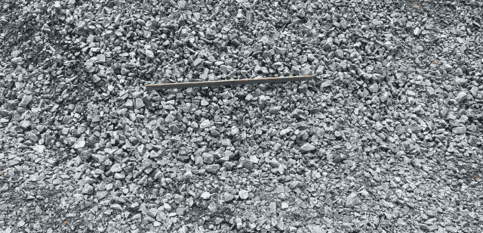
Одиночная шкала
Используйте одну физическую шкалу, когда материал расположен приблизительно в одной плоскости с небольшим изменением глубины по всему изображению. Это НЕ лучший метод для полевых снимков, за исключением случаев съемки относительно плоской поверхности сверху вниз или перпендикулярно.
Подробнее об объектах-ориентирах физического масштаба можно прочитать в разделе Руководство пользователя WipFrag.
Двойная шкала
Используйте две физические шкалы, если материал значительно наклонен от камеры. Разместите шкалы на разной глубине (передний план и задний план), ориентируя их горизонтально на изображении, чтобы WipFrag мог учесть изменение перспективы. Это лучший метод для полевых снимков при использовании физических масштабных эталонных объектов.
Подробнее об объектах-ориентирах физического масштаба можно прочитать в разделе Руководство пользователя WipFrag.
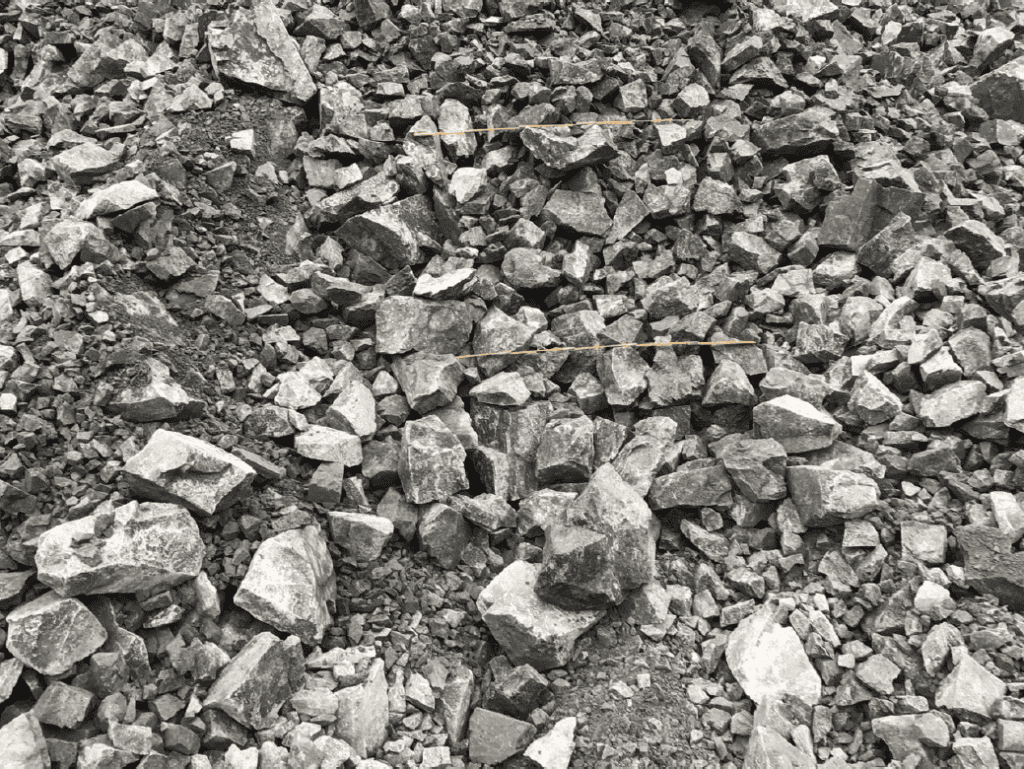
Размещайте весы на видном месте, не скрывая при этом важную информацию.
| НАЗЕМНЫЕ ИЗОБРАЖЕНИЯ – СДЕЛАТЬ |
|---|
|
✓
Сделайте снимки нескольких репрезентативных мест.
|
|
✓
Заполните рамку материалом.
|
|
✓
Сохраняйте резкость и фокусировку изображения.
|
|
✓
Необходимо собрать достаточное количество частиц, чтобы представить образец.
|
|
✓
По возможности используйте равномерное освещение.
|
|
✓
Используйте соответствующий метод масштабирования.
|
|
✓
Сгруппируйте изображения каждой кучи, взрыва или образца.
|
|
✓
Если одно изображение не может отобразить весь необходимый диапазон размеров, сделайте дополнительные снимки.
|
| НАЗЕМНЫЕ ИЗОБРАЖЕНИЯ – ИЗБЕГАЙТЕ |
|---|
|
✕
Отбор только самых грубых или самых тонких на вид участков.
|
|
✕
Использование одной удобной фотографии для представления большой или изменчивой выборки.
|
|
✕
Крайние косые углы.
|
|
✕
Крупные планы с широкоугольным обзором.
|
|
✕
Цифровой зум.
|
|
✕
Использование единого масштаба там, где имеется значительная глубина или уклон.
|
|
✕
Ввод неустойчивого материала для размещения масштабного объекта.
|
|
✕
Заполнение изображения лишними элементами: небом, землей, оборудованием или окружающей обстановкой.
|
| ПОМНИТЬ |
| Для использования WipFrag вам НЕ НУЖНЫ объекты-ориентиры масштаба. Встроенная функция автоматического масштабирования чрезвычайно мощна. Попробуйте её несколько раз, чтобы увидеть, как она работает на вашем типе устройства. |

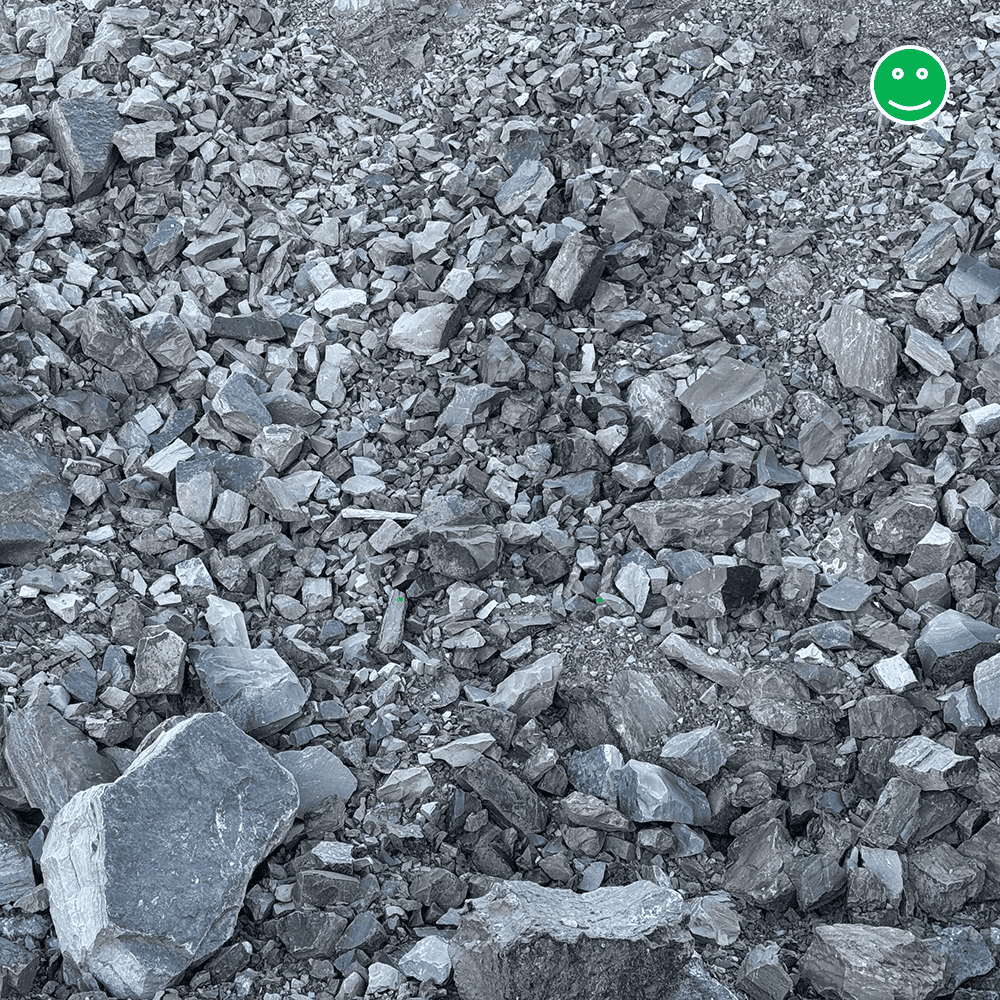
Примеры наземных изображений – хорошего качества:
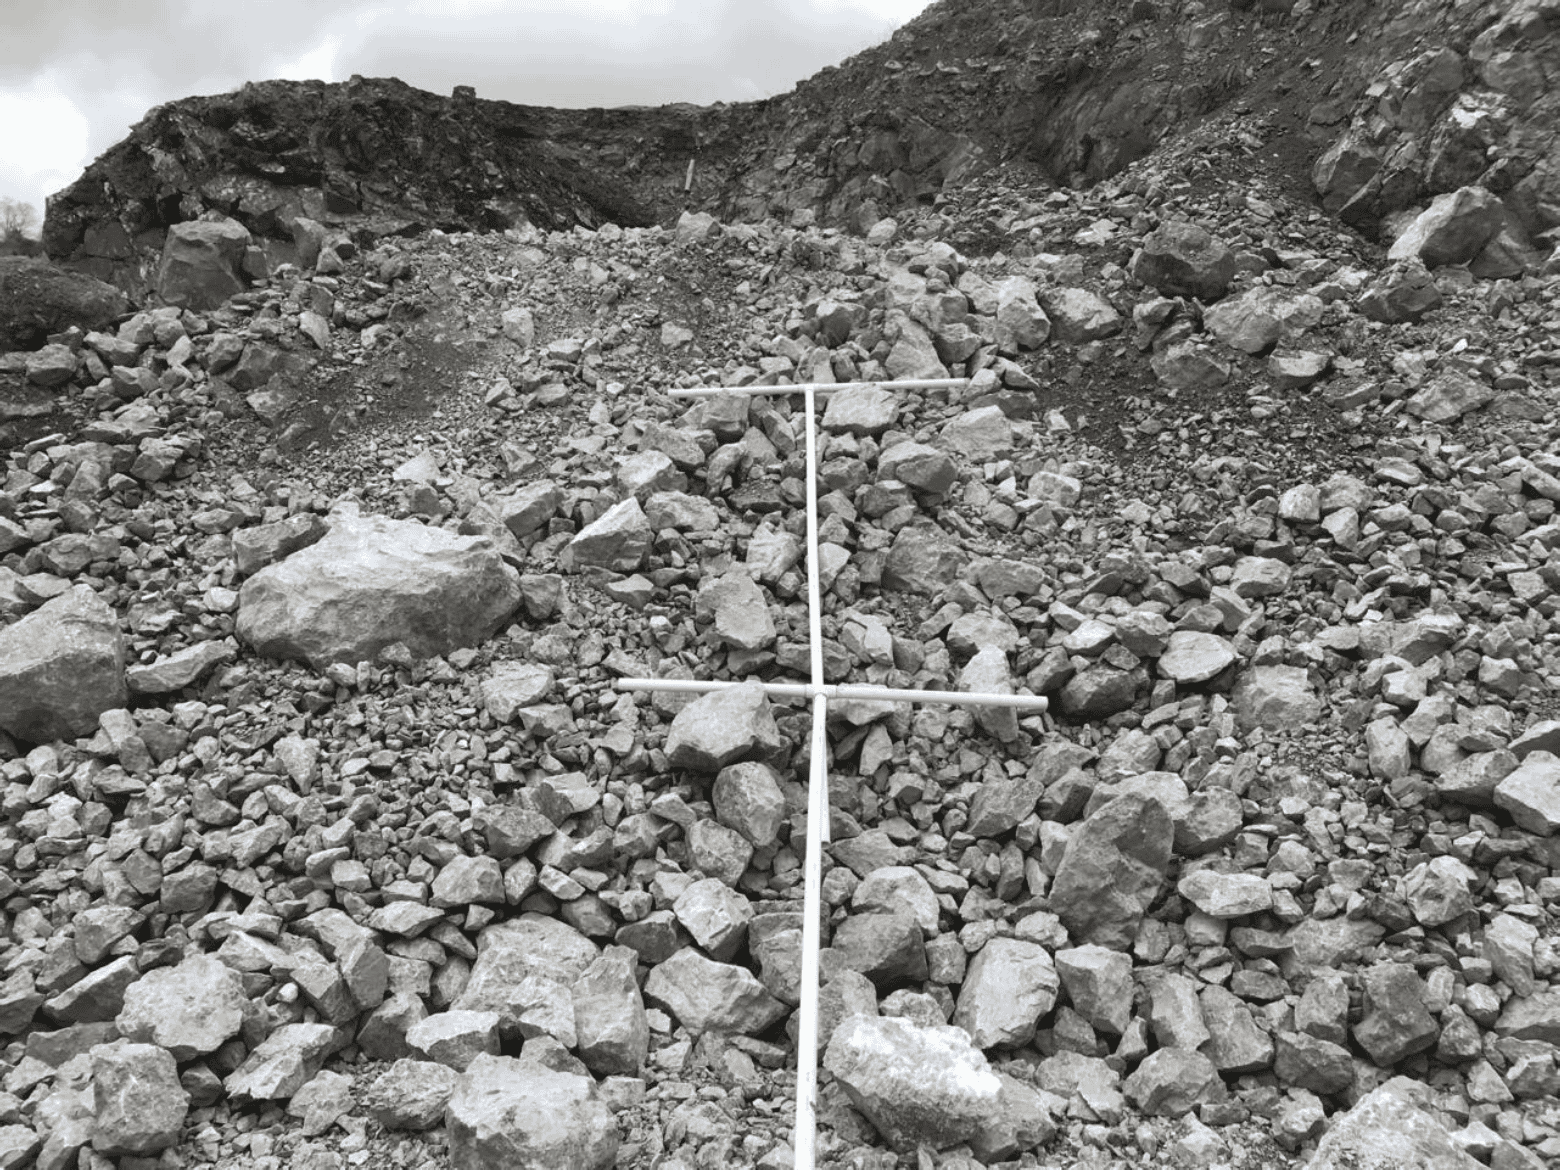
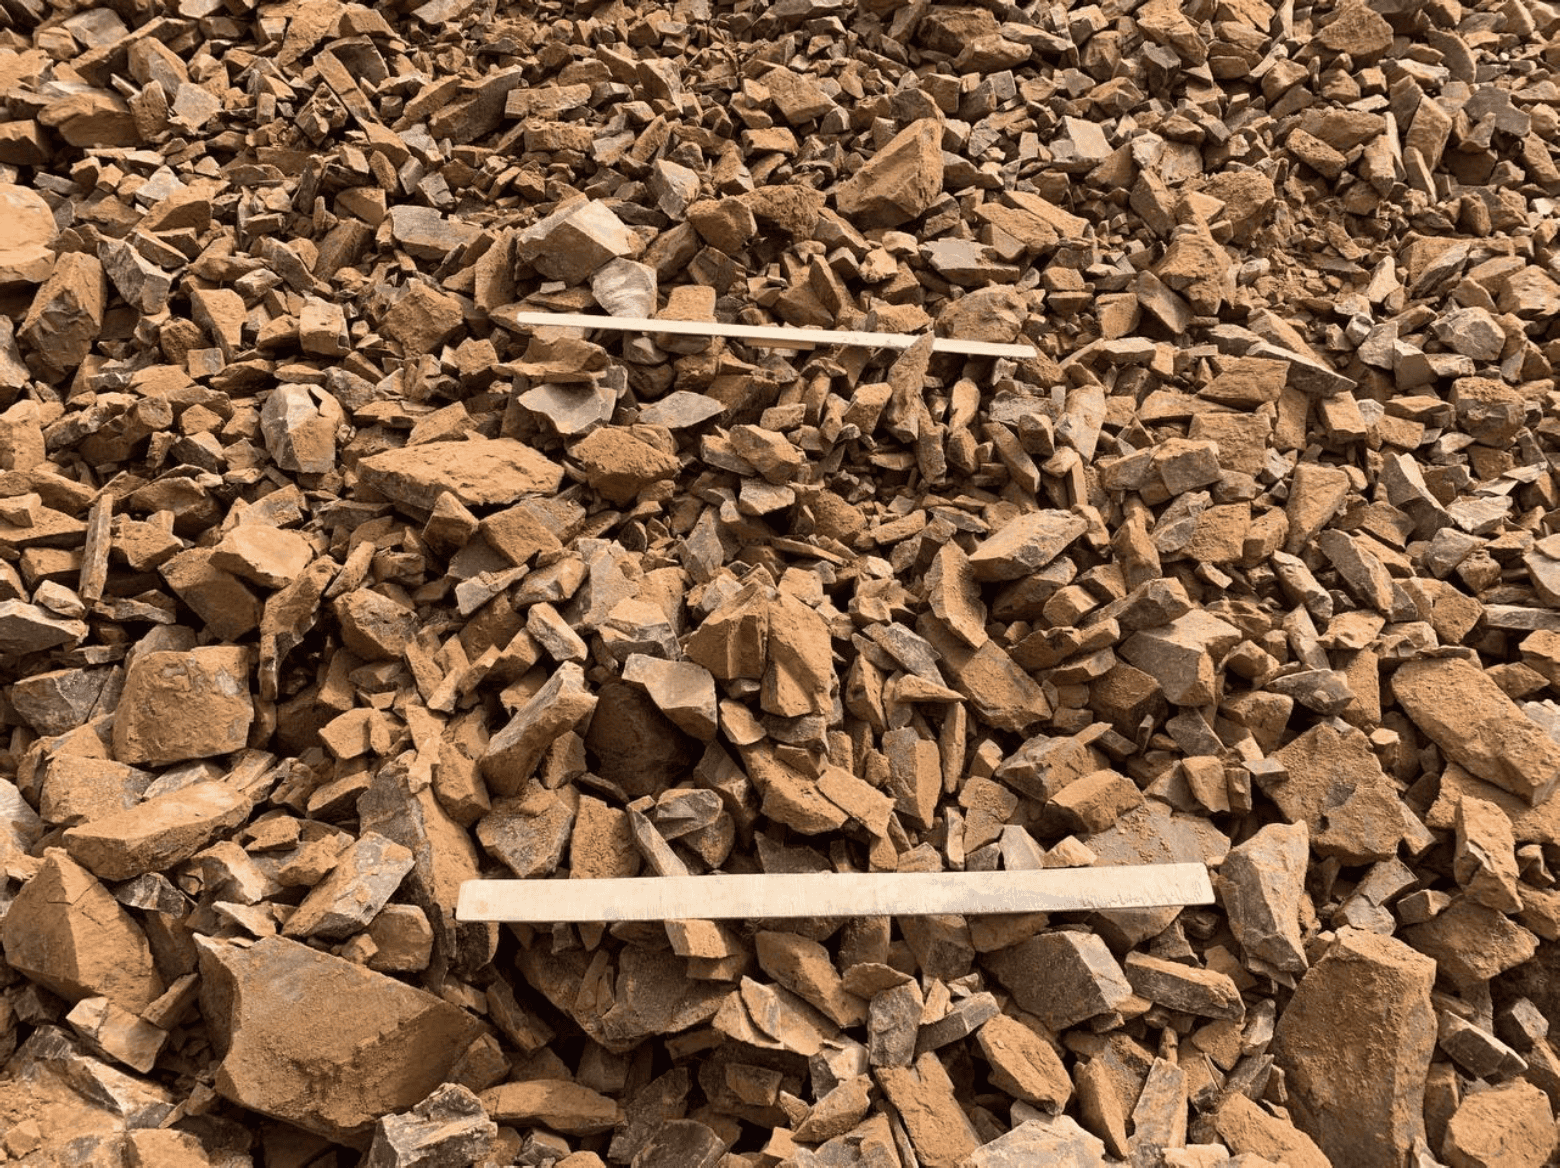
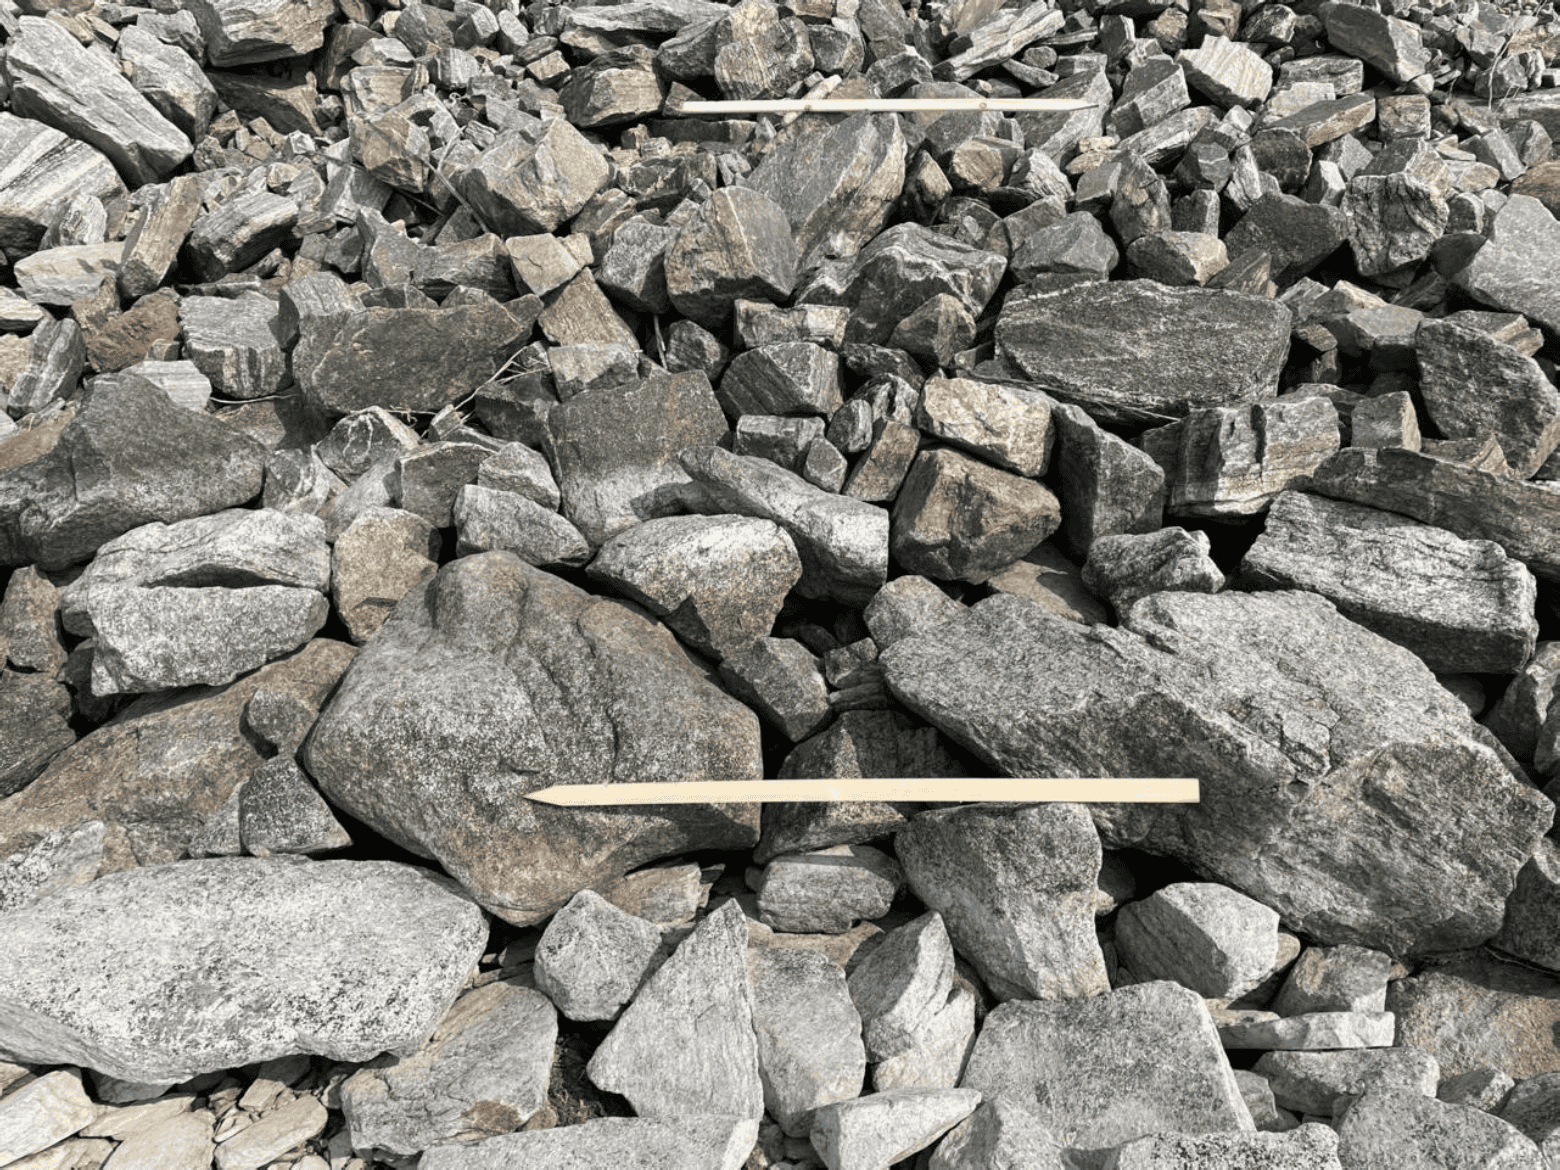

Примеры наземных изображений – плохого качества:
Перейти к:
2. Изображения, полученные с помощью БПЛА/дронов – съемка больших площадей.
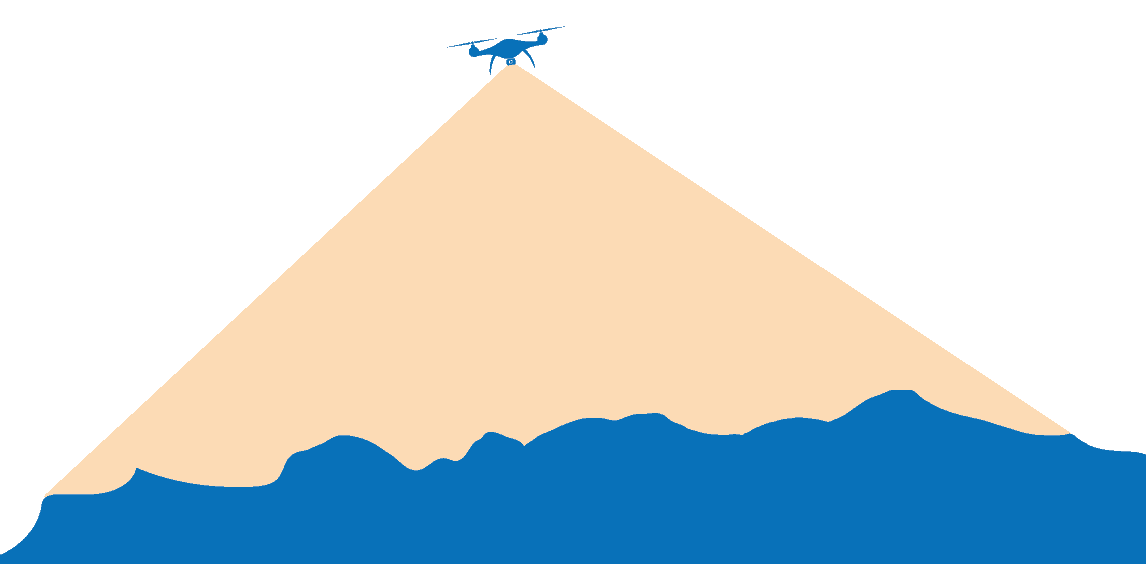
Снимки, полученные с помощью беспилотных летательных аппаратов, полезны для съемки больших отвалов, взрывов, складов материалов и других участков, которые трудно отобразить на наземных фотографиях.
При проведении ортомозаичного анализа в WipFrag следует сосредоточиться на трех вещах: Полное покрытие, достаточное перекрытие и достаточная детализация изображения для того, чтобы увидеть важные частицы..
Спланируйте перелет
Осмотрите всю область, которую вы собираетесь анализировать, включая ее края.
Для автоматизированного картографического полета:
- Направьте камеру прямая вниз (90°).
- Использовать приблизительно 80% перекрытие изображений в направлении движения и между соседними линиями полета.
- Используйте регулярную сетку или схему облета по карте.
- Хранить постоянная высота во время прохождения карты.
- Снимайте четкие статичные изображения без размытия, вызванного движением.
Выберите подходящую высоту
В качестве практической отправной точки, 20–40 м над материалом Подходит для многих применений.
Отрегулируйте высоту с учетом положения камеры, размера частиц, покрываемой площади и рельефа местности.
Полёт на большей высоте охватывает большую площадь, но снижает детализацию частиц. Полёт на меньшей высоте обеспечивает большую детализацию, но требует больше снимков и тщательного охвата.
Летайте достаточно низко, чтобы частицы, которые вас интересуют, оставались хорошо видимыми..
Проверьте условия полета
Выберите условия, которые позволят БПЛА оставаться стабильным и получать четкие, равномерно экспонированные изображения.
Избегайте сильного ветра, дождя, плохой видимости, сильных бликов, глубоких теней и других условий, которые могут привести к размытым или плохо экспонированным изображениям.
Перед тем как покинуть сайт, проверьте изображения. резкость и полное покрытие когда это будет практически возможно.
Масштабирование изображений, полученных с помощью БПЛА
Для работы с ортомозаикой, созданной с помощью БПЛА в WipFrag, физический масштабный объект обычно НЕ требуется.
Обратитесь к Руководство пользователя WipFrag Для ознакомления с текущей процедурой создания, масштабирования и анализа ортомозаик, или перейдите по ссылке: Учебное пособие по ортомозаике БПЛА на нашем YouTube-канале.
| ИЗОБРАЖЕНИЯ С БПЛА – СДЕЛАТЬ | ИЗОБРАЖЕНИЯ С БПЛА – ИЗБЕГАЙТЕ |
|---|---|
|
✓
Полностью окройте зону взрыва или зону отбора проб.
|
✕
Наклонные пейзажные фотографии для ортомозаичного анализа.
|
|
✓
Используйте повторяющийся картографический полет.
|
✕
Не удалось охватить периметр взрыва.
|
|
✓
Направьте камеру прямо вниз.
|
✕
Недостаточное перекрытие изображений.
|
|
✓
Сохраняйте приблизительное перекрытие 80%.
|
✕
Взлет на неоправданно большую высоту.
|
|
✓
Летайте достаточно низко, чтобы различить интересующие вас частицы.
|
✕
Полеты на такой низкой высоте приводят к фрагментации или неполноте покрытия.
|
|
✓
После полета проверьте резкость изображения и охват.
|
✕
Размытые изображения.
|
|
✓
Снимайте изображения, полученные в результате разных взрывов или полетов, и четко разделяйте их.
|
✕
Объединение изображений, полученных в результате отдельных взрывов, в одну ортомозаику.
|
| РУКОВОДСТВО ПО УПРАВЛЕНИЮ БПЛА И ЗАХВАТУ |
| Если автоматизированные траектории полета НЕТ Подходит для вашего БПЛА/дрона, используйте его. Метод лестницы: |
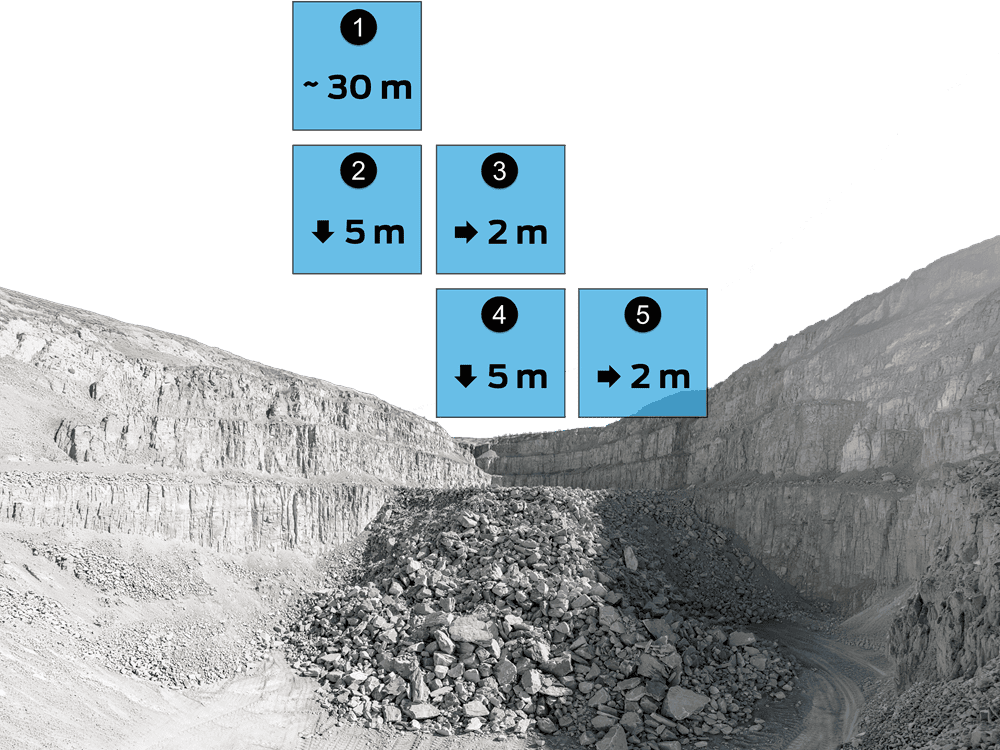
- Начните восхождение на высоте приблизительно 30 метров (98,5 футов). Над объектом. Сделайте снимок.
- Двигайтесь вниз на 5 метров (16,5 футов). Сделайте снимок.
- Перемещайтесь горизонтально на 2 метра (6,5 футов). Сделайте снимок.
- Двигайтесь вниз на 5 метров (16,5 футов). Сделайте снимок.
- Перемещайтесь горизонтально на 2 метра (6,5 футов). Сделайте снимок.
- Повторяйте этот шаблон по мере необходимости., Перемещаясь по исследуемой области, сделайте не менее 5 фотографий.
Перейти к:
3. Подземная фотосъемка

Подземная фотосъемка основана на тех же основных принципах, что и полевая фотография, но освещение и рабочее расстояние требует особого внимания.
Начните с безопасной точки зрения.
Работайте из безопасного положения, имея хороший обзор материала.
НЕ следует спускаться на незакрепленный грунт, в проходческий забой или на неустойчивый материал только для того, чтобы улучшить изображение или установить масштаб.
Используйте широкое, равномерное освещение.
Используйте достаточное освещение, чтобы границы частиц оставались видимыми, не создавая при этом глубоких теней или ярких бликов.
Там, где это практически возможно:
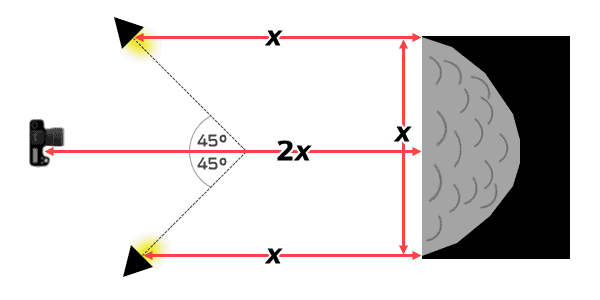
- расположите по одному источнику света с каждой стороны камеры;
- Поднимите светильники повыше;
- Направляйте их поперек материала, а не прямо из положения камеры; и
- Используйте широкие портативные источники света, такие как светодиодные панели.
Это обеспечивает более равномерное освещение, при этом оставляя достаточно тени для различения соседних частиц.
Избегайте прямого воздействия вспышки фотоаппарата.
НЕ следует полагаться на встроенную или установленную на камере вспышку в качестве основного источника света. Свет, идущий близко к объективу, может исказить изображение и затруднить различение границ частиц.
Один яркий источник света с одной стороны может создать противоположную проблему, отбрасывая большие темные тени.
По возможности используйте несколько источников широкого светового потока.
Стабилизировать камеру
При недостаточном освещении используйте штатив или другую устойчивую опору.
Чёткое изображение с длительной выдержкой лучше, чем снимок, сделанный с рук, с размытием от движения.
Обрабатывайте крупные заготовки и груды материалов по секциям.
Не следует отходить слишком далеко, чтобы интересующие вас частицы стали слишком мелкими для наблюдения, просто чтобы уместить всю область на одном изображении. Вместо этого, захватывайте область в нескольких повторяющихся участках и объединяйте результаты анализа там, где это необходимо.
Подземное изображение. Захват геометрии.
Где x — это ширина области образца, которая также является расстоянием до источников света. Положение камеры для захвата изображения должно быть в два раза больше этого расстояния (2×).x) прочь.
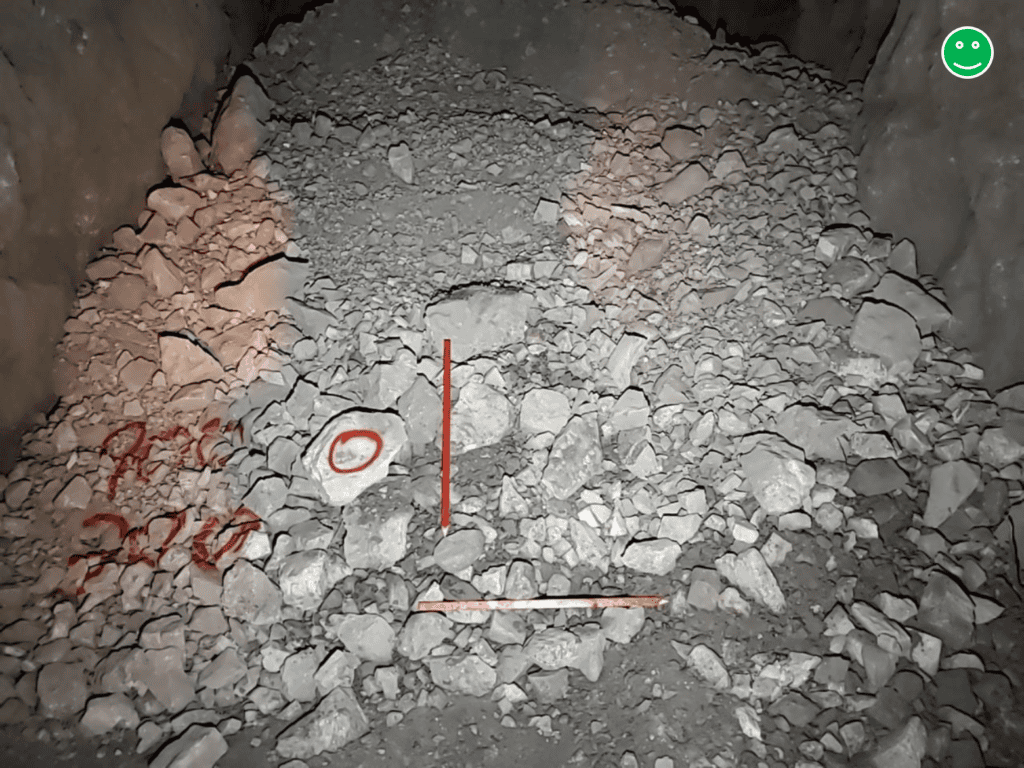
| ИЗОБРАЖЕНИЯ ПОДЗЕМНОГО ПРОСТРАНСТВА – СДЕЛАЙТЕ ЭТО |
|---|
|
✓
Работайте из безопасного места.
|
|
✓
По возможности используйте два или более источников широкого светового потока.
|
|
✓
Расположите источники света вдали от оси камеры.
|
|
✓
При слабом освещении используйте штатив.
|
|
✓
Заполните рамку отбираемым образцом материала.
|
|
✓
При необходимости проводите систематическое обследование больших площадей.
|
|
✓
Используйте двойную шкалу при фотографировании материалов со значительной глубиной резкости.
|
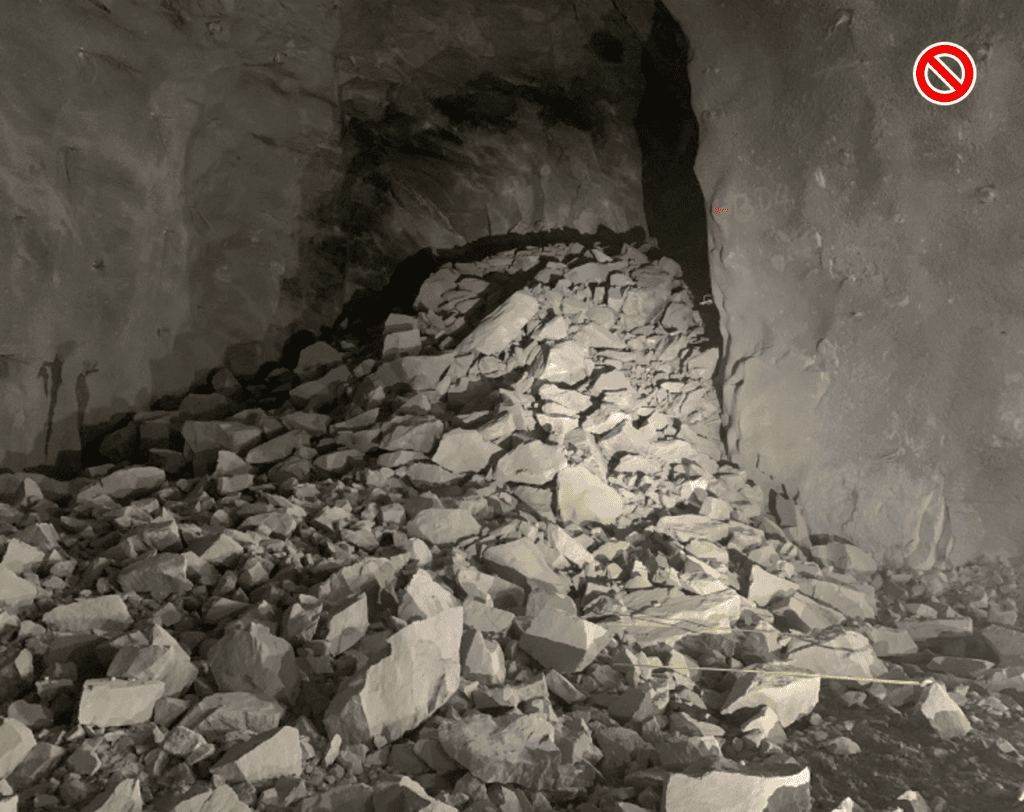
| ИЗОБРАЖЕНИЯ ПОДЗЕМНОГО МИРА – ИЗБЕГАЙТЕ ИХ |
|---|
|
✕
Вспышка, установленная на камере.
|
|
✕
Один резкий прожектор.
|
|
✕
Глубокие тени, скрывающие материальные вещи.
|
|
✕
Яркий блик на мокрых поверхностях.
|
|
✕
При наличии лучшего освещения или более качественной камеры изображения получаются шумными или размытыми.
|
|
✕
Отодвинулись подальше, чтобы всё уместилось на одном снимке.
|
|
✕
Заходить на небезопасную территорию для установки весов.
|
Перейти к:
4. Лабораторные образцы, лотки и микроскопия
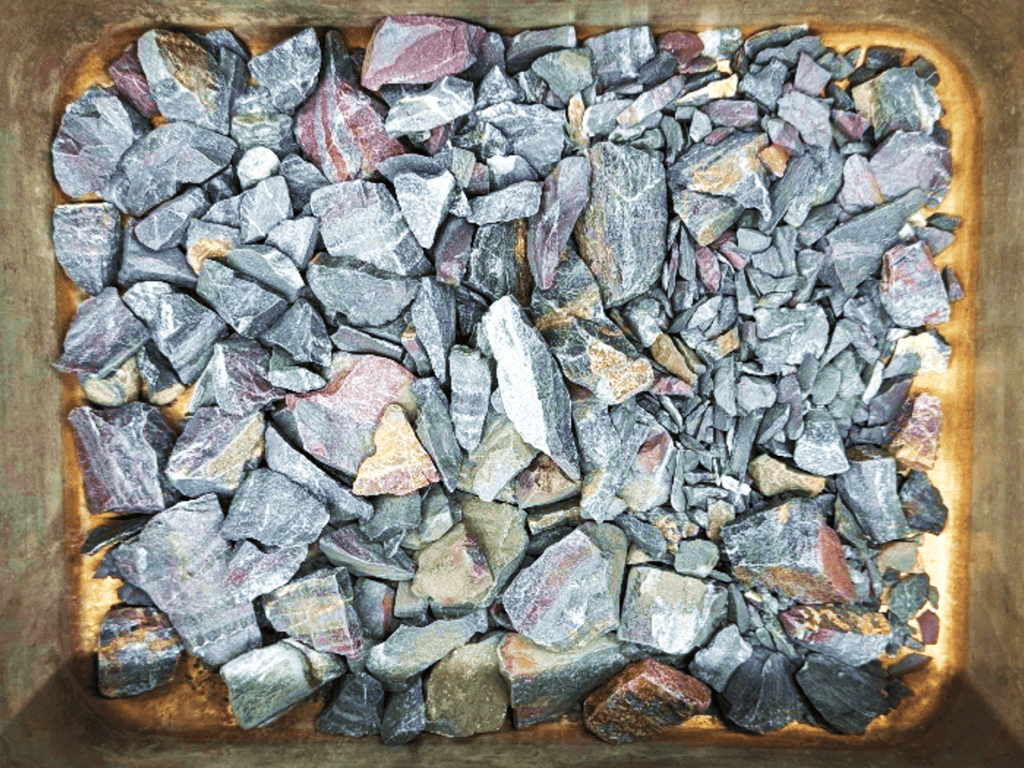
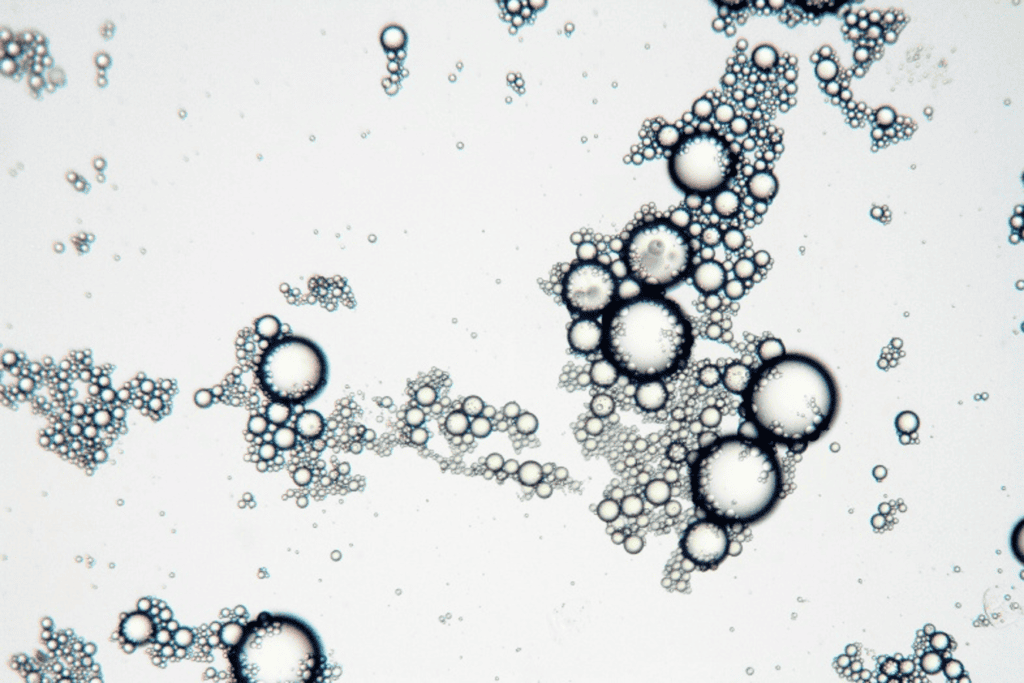
Для контролируемых образцов приоритет отдается... повторяемость. Необходимо обеспечить единообразие подготовки образцов, положения камеры, освещения и масштаба при проведении сопоставимых анализов.
Подготовьте образец
Распределите материал так, чтобы частицы, которые необходимо измерить, были видны.
НЕ следует располагать частицы по размеру или удалять частицы просто для облегчения анализа изображения. Фотографируемый материал должен оставаться репрезентативным для образца.
Если частицы перекрываются настолько, что скрывают свои границы, уменьшите глубину образца или разделите материал на несколько репрезентативных частей.
Снимок сделан непосредственно сверху.
Расположите камеру перпендикулярно поверхности лотка или образца.
Для многократного тестирования, по возможности, используйте стационарную подставку для камеры или штатив. Держите камеру на месте. высота камеры, поле зрения, освещение и область образца согласуется от одного анализа к другому.
Используйте равномерное освещение.
Используйте рассеянное, равномерное освещение по всей поверхности образца.
Избегайте сильных направленных теней, бликов, ярких пятен или неравномерного освещения.
Масштабировать изображение
Для плоского подноса или образца используйте одиночные весы, расположенные в той же плоскости, что и материал.
Изображения, снятые сверху, также можно получить с помощью поддерживаемого рабочего процесса автоматического масштабирования. См. раздел Руководство пользователя WipFrag Инструкции по использованию автоматических весов.
| ИЗОБРАЖЕНИЯ ЛАБОРАТОРИИ И ПОДНОСОВ – СДЕЛАЙТЕ | ИЗОБРАЖЕНИЯ ЛАБОРАТОРИИ И ПОДНОСОВ – ИЗБЕГАЙТЕ |
|---|---|
|
✓
Используйте повторяющееся положение камеры.
|
✕
Расположение или отбор частиц с целью изменения их видимого распределения.
|
|
✓
Сделайте снимок перпендикулярно образцу.
|
✕
Наклоняя камеру.
|
|
✓
Используйте равномерное, рассеянное освещение.
|
✕
Глубокие слои, скрывающие границы частиц.
|
|
✓
Заполните большую часть изображения образцами материала.
|
✕
Размещение шкалы выше или ниже плоскости частиц.
|
|
✓
Обеспечьте единообразие в подготовке образцов.
|
✕
Изменение параметров захвата между сопоставимыми образцами.
|
|
✓
Разместите физическую линейку на той же плоскости, что и материал.
|
✕
Сильные тени, отражения или блики.
|
Для микроскопических изображений
Те же принципы применимы и на микроскопическом уровне: чистые частицы, известный масштаб, постоянные условия сбора и репрезентативный отбор проб.
- Убедитесь, что интересующие вас частицы четко различимы и находятся в фокусе.
- Используйте шкалу, соответствующую увеличению микроскопа.
- При сравнении образцов необходимо поддерживать одинаковое увеличение.
- Обеспечьте равномерное освещение по всему полю зрения.
- Избегайте переэкспозиции, которая приводит к визуальному слиянию соседних частиц.
- Снимайте несколько репрезентативных полей зрения, а не выбирайте только самые чистые или легкодоступные участки.
- Необходимо обеспечить единообразие подготовки образцов при проведении сравнительных анализов.
| МИКРОСКОПНЫЕ ИЗОБРАЖЕНИЯ – ДЕЛАТЬ | ИЗОБРАЖЕНИЯ, ПОЛУЧЕННЫЕ С ПОМОЩЬЮ МИКРОСКОПА – ИЗБЕГАЙ |
|---|---|
|
✓
Используйте калиброванные весы.
|
✕
Используя шкалу с другим увеличением.
|
|
✓
Поддерживайте постоянное увеличение.
|
✕
Выбор только самых простых для анализа областей.
|
|
✓
Сохраняйте плоскость изображения в фокусе.
|
✕
Использование изображений, на которых соседние частицы невозможно различить.
|
|
✓
Осуществите съемку в нескольких репрезентативных полях зрения.
|
✕
Изменение настроек микроскопа или параметров съемки во время сравнительного исследования без документирования этих изменений.
|
|
✓
Запишите использованное увеличение или шкалу.
|
Перейти к:
5. Перед тем, как покинуть образец
Контрольный список WipFrag Capture
Прежде чем двигаться дальше, подтвердите:
- Представитель — Собрал ли я материал в соответствии с планом отбора проб, а не просто выбирал то, что показалось мне интересным?
- Достаточное покрытие — Сделал ли я достаточно снимков, чтобы представить исследуемую область?
- Острый — Могу ли я четко различить интересующие меня частицы?
- Правильно оформлено — Изображение в основном заполнено измеряемым материалом?
- Хорошее освещение — Видны ли границы частиц без чрезмерного затенения, бликов или переэкспозиции?
- Правильный масштаб — Правильно ли я использую функции автоматического масштабирования, одинарного масштабирования, двойного масштабирования или рабочий процесс БПЛА?
- Полный размерный ряд — Могу ли я увидеть размеры частиц, которые имеют значение, или мне нужны дополнительные снимки крупным планом или с более широкого ракурса?
- Организованный — Знаю ли я, какие изображения относятся к этому образцу, куче, взрыву, полету или проекту?
| БОЛЬШЕ ИНФОРМАЦИИ |
|
Пошаговые инструкции по методам масштабирования, созданию ортомозаик с БПЛА, анализу слияния, обнаружению границ и другим функциям программного обеспечения WipFrag см. в последней версии. Руководство пользователя WipFrag, то Часто задаваемые вопросы о WipFrag или посетите наш Видео библиотека для обучающих материалов. После завершения анализа используйте Руководство по интерпретации результатов для понимания кривой спектральной плотности мощности, значений D, статистики, гистограммы, огибающей спецификации, измерений формы и других результатов WipFrag. |
Перейти к:
Дополнительная информация
Учетные записи, подписки и кредиты
Посещать wipwareaccount.com/register Чтобы создать бесплатную учетную запись WipWare, вы получите доступ к своей подписке WipFrag и/или авторским правам на изображения, а также к синхронизированным с облаком файлам анализа.
Если у вас уже есть учетная запись, вы можете войти по адресу: wipwareaccount.com/login. Там вы можете изменить данные своей учетной записи, управлять устройствами, подключенными к вашей учетной записи WipWare, и изучить другие возможности. Для доступа к платным функциям, использования облачного хранилища и синхронизации файлов анализа обязательно войдите в свою учетную запись WipWare внутри WipFrag.
Для приобретения или продления подписки, а также для пополнения счета, свяжитесь с региональным представителем WipWare. Вы также можете приобрести или продлить подписку онлайн через PayPal или кредитную карту, посетив сайт. wipwareaccount.com/store. Автоматическое продление подписки на WipFrag не предусмотрено.
| ОБНОВЛЕНИЯ ПРОГРАММНОГО ОБЕСПЕЧЕНИЯ |
| Обязательно обновляйте WipFrag до последней версии! Регулярные обновления WipFrag предоставляются через Интернет. |
Примеры полевого оборудования
Примечание: Для полноценной работы мобильные устройства должны иметь встроенный GPS-приемник, акселерометр, гироскоп и магнитометр.
| Смартфоны | |
|---|---|
| Apple iPhone 12 Google Pixel 6a Samsung Galaxy S21 5G -или- A53 5G | Экономичные смартфоны, отвечающие базовым требованиям. |
| Apple iPhone 15 Pro Max Samsung Galaxy S26 Ultra | Премиальные смартфоны с большими экранами, улучшенными камерами, датчиками и процессорами. |
| Таблетки | |
|---|---|
| Apple iPad Pro (5th Ген) [Клеточный] Samsung Galaxy Tab A11 -или- S10 Lite | Экономичные планшеты, отвечающие основным требованиям |
| Apple iPad Pro M4 [Сотовая связь] Samsung Galaxy Tab S10 Ultra -или- S9 FE | Планшеты премиум-класса с большими экранами, улучшенными камерами, датчиками и процессорами. |
| Цифровые фотоаппараты | |
|---|---|
| OM System Tough TG-7 | Прочная экономичная полевая камера; водонепроницаемая, пылезащитная, ударопрочная, с GPS. |
| Система OM TCON-T01 | Аксессуар TG-7; дополнительный телеконвертер для увеличения оптической дальности. |
| Sony RX10 IV | Суперзум-камера дальнего действия; профессиональная, не защищенная от внешних воздействий. |
| Дроны / БПЛА | |
|---|---|
| DJI Mini 5 Pro | Беспилотник с ручным управлением; экономичный класс, вес менее 250 г. |
| DJI Mavic 3 Enterprise | Рекомендуемый дрон; премиум-класса, готовый к использованию, совместимый с автоматическим режимом полета. |
| Skydio X10 -или- X10D | Беспилотник ограниченного доступа / соответствующий требованиям; для NDAA / «синих» БПЛА / «зеленых» БПЛА и т. д. |
| Лазерные дальномеры / Электродальномеры | |
|---|---|
| Bosch BLAZE GLM165-22 –или- 27С | Экономичный; строительного класса |
| Leica DISTO X1 | Рекомендуется; большая дальность действия, более высокая уверенность. |
| Подземные фонари | |
|---|---|
| Уланци ВЛ200 | Светодиодная панель; портативная, легкая, заряжается через USB или от батареи. |
| Штативы / Стойки для осветительных приборов | |
|---|---|
| Уланци МТ-89 | Телескопический штатив; портативный, легкий, полупрочный, универсальное крепление. |
| О ПРИМЕРАХ ПОЛЕВОГО ОБОРУДОВАНИЯ |
| Приведенные примеры основаны на устройствах, которые неизменно обеспечивают наилучшее взаимодействие с пользователем. Компания WipWare НЕ выражает явной поддержки этим продуктам. |
 WipWare