By: Paul Chivers
Photoanalysis system data can be used for process control or to track relative changes without calibration. However, if your goal is to replace manual sieving then calibration is required. The calibration procedure outlined below is taken from the Calibration Document which is available to photoanalysis system users after logging into the Customer Download Area of the Downloads section of the WipWare website.
Calibration is the final step for system installation and cannot occur until all hardware and software adjustments have been characterized. These include mechanical setup; optical adjustments; scale settings; trigger settings; image quality settings and edge detection parameters. If any of these variables change, the system will require recalibration.
STEP 1: Stop Belt (perform a crash stop)
Once a system has been characterized and the process is running normally calibration can begin. Note that calibration is only effective if the material is unaffected by external variables not related to normal production (i.e., slower belts, partial process shutdown, etc…).
STEP 2: Image Material
In Delta, snap an image of the material. Save the image as ‘Calibration 1.bmp’ and close it. Place a scale reference (ruler, card, paper … of known dimensions) on top of the material in the viewable area. In Delta, snap another image and save it as ‘Scale 1.bmp’ before closing it.
STEP 3: Take Material for Sieving
In Delta, open the live image view. Find and mark the upper and lower limit of the viewable material on the belt. Remove the entire sample for sieving. Do not use coning, quartering, or riffling. The whole sample must be sieved.
STEP 4: Restart Belt & Sieve
All information has been gathered and your process can be restarted. Sieve the material before proceeding to next step.
STEP 5: Set Scale Factor
In Delta, open ‘Scale 1.bmp’ and set the scale using the scale reference of known length. Because the image was opened from a file, be sure the ‘Source’ is set to ‘Image File’. Close ‘Scale 1.bmp’.
STEP 6: Set EDPs
Open ‘Calibration 1.bmp’. Open the Options menu to get to the ‘Edge Detection Parameters’ tab and take note of which EDP preset is selected for the camera you are calibrating (i.e., Camera 1). Change the ‘Source’ to ‘Image File’ and select the same EDP preset from the previous step.
STEP 7: Set Size Classes
Select the ‘Output’ tab and take note of which Size Class preset is selected for the camera you are calibrating. Change the ‘Source’ to ‘Image File’ and select the same Size Class preset from the previous step. Make sure there is no calibration preset selected. Hit Apply and OK to save your changes.
STEP 8: Get Delta Values
Hit the ‘Generate Net’ button. Hit the ‘Sieve’ button. Take note of the following values: n, Xc, b, Xmax, X50. Save the chart as ‘Delta 1.bmp’. 
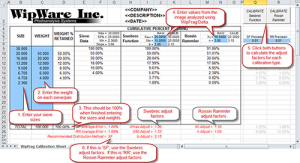
STEP 9: Enter Data into Calibration Sheet (See image to the right)
Only enter data in the blue squares:
1. Under ‘SIZE’, enter your size classes (largest on top).
2. Under ‘WEIGHT’, enter the weight on each sieve/pan.
3. The next column, ‘WEIGHT % RETAINED’, will be completed automatically and if done correctly the total at the bottom should be 100%.
4. Enter the ‘Xmax’, ‘X50’, ‘b’, ‘n’ and ‘Xc’ values you recorded previously from Delta into the appropriate blue box.
STEP 10: Calculate Adjust Factors (See image to the right)
With macros enabled, hit both the ‘CALIBRATE Swebrec Function’ and ‘CALIBRATE Rosin Rammler’ buttons. The Swebrec calculation is very quick. The Rosin Rammler function may take much longer. Once both functions have been completed, take note of the ‘Recommended Distribution Method’. If this reads ‘SF’, use the Swebrec adjust factors. If this reads ‘RR’, then use the Rosin Rammler adjust factors.
STEP 11: Enter Adjust Factors into Delta
In Delta, go into the Options menu and select the ‘Output’ tab. In the calibration dropdown select a ‘Calibration Preset’. You can rename this preset if you wish. Select either ‘R-R’ or ‘Swebrec’ based on what the calibration sheet recommended. Enter the adjust factors you recorded from the calibration sheet. Hit Apply/OK and put the system back online.
The System is Now Calibrated!
All steps are complete and the camera that was calibrated will now be outputting calibrated data.